How to detect the complete scroll of your license agreement

Hello everyone, I hope you’ve all been well!

One extremely useful feature in the latest releases of InstallAware – assuming of course that you’re a sadistic developer and/or have a legal department with torturous inclinations – is detecting the scroll state of your license agreements. I’m sure you’ve seen those pesky setup programs which check whether you’ve scrolled all the way to the bottom before enabling the Next button. Well, now you can build those pesky setups in InstallAware also ๐Ÿ™‚ We’ve recently added (7.5 and 7 R2) the capability to detect the scroll state of text boxes and richedit boxes – the two dialog controls which are likely to host your license agreement files in InstallAware.

Of course, in the good InstallAware tradition, thanks to our generic implementation, you can even force the scrolling of your readme files, or any other custom files. Joy to the hearts of those who find this a useful feature ๐Ÿ˜‰ When a Memo or RichEdit dialog control gets scrolled to the bottom, it now automatically sets its MaxLength property to 214783647 (that funny number is actually MAXINT from the Platform SDK). So if you want to check/enforce such scrolling, you just make use of this property. Let’s now go through a walkthrough of this:

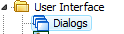
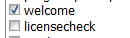
First, you want to open up your license agreement dialog in the InstallAware Dialog Editor. One way of doing this is selecting the Design tab on the InstallAware IDE, clicking the Dialogs and UI button in the Views group, choosing the Dialogs page which lists all available dialogs in your current setup project, and then double clicking “licensecheck” – which is the default dialog that is used for showing license agreements. Of course, feel free to open any other dialog that you’d like to add this behavior to.

Once the dialog is open, double-click any control on the dialog until you see the Object Behavior window come up.

Go to the “Object Rules” tab to add two new rules, one to disable the Next button when scrolling has not occurred, and the other to enable it when scrolling has indeed occurred.


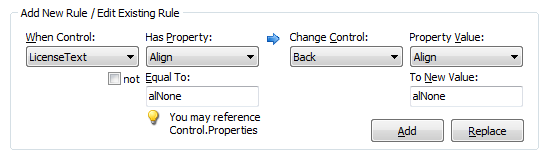
First, the rule that disables the Next button if the scrolling has not yet occured:

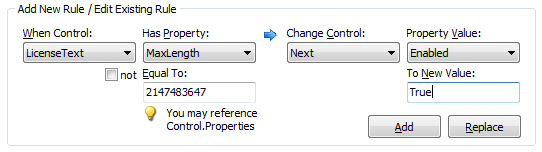
And second, the rule that enables the Next button when the scrolling has occured:

So, your rules should now look something like this:

The ordering is important when you have multiple rules. Always make sure that the disabling rules come first and the enabling rules come last. While in this example we only have one set of rules, observing the disable first/enable last rule of thumb becomes necessary when the Next button has multiple constraints upon it (for example, both a check-box and the scroll condition). You can always re-sort rules after having already added them using the Up/Down buttons located at the lower left corner of the Existing Rules listing.

Remember that you can always add more rules to fit your requirements! For instance, you could just as well enable/disable the proverbial I Agree check-box, instead of manipulating the Next button directly. Just use the simple logic demonstrated here: check whether the MaxLength property of the LicenseText control is equal to 2147483647 yet or not.

Let me know if you have any questions! Until my next post, have a great week! Now, go and make your users suffer ๐Ÿ˜‰

Panagiotis Kefalidis
Software Design Team Lead
InstallAware Software Corporation

InstallAware goes Aero with Vista Glass component

Hello again. I’d promised myself to make at least one post per week here, but the last two weeks, boy, have been a hell of a time for me – I almost broke my leg and then got a real bad cold that’s still bothering me. Now I know how Walt Disney’s Donald Duck feels about his bad luck. Anyway, my leg is better, it doesn’t hurt so much anymore and I’ve decided that its time to get back on this blog and post some new stuff. Some cool stuff, like the Vista Glass component on InstallAware’s forms designer.

The Vista Glass component gives the glass feeling (Aero) to your setup UI, making window regions appear “glassy” like Windows Media Player on Windows Vista. Although still in beta, it works like a charm. In this post, you’ll find info about how to use it, what it does, what the drawbacks are, how to overcome them and you’ll get a push on creating your very first InstallAware Theme with Vista Glass support. Amazing, isn’t it? And it gets better.

Getting Started

In order to start exploiting InstallAware’s Vista Glass features, you’ll want to create a new project (you could also use an existing project, but this is just experimentation so I suggest creating a new one). Then, in the visual designers, go to the “User Interface” section and click on the “Dialogs” option.

You get a list of the dialogs in your project sorted by the order they appear during install procedure. Highlight the “Welcome” dialog and get a preview of it, before beginning to apply Vista Glass effects.

ย 

When you double click a dialog, the form designer pops up, allowing you to change anything you want on your form, from simply re-arranging elements (textboxes etc.), to creating scripted events and reading/writing variables to interact with MSICode.

Let’s Go Glass!

Finding the Vista Glass component is really easy. Click the “Win32” tab and the right-most control on the palette is “VistaGlass”, the one we’re looking for.

Click the component icon and then click anywhere on the dialog form. The VistaGlass component icon appears on your dialog. Click it to edit it’s properties: change the “GlassEnabled” and “SheetOfGlass” properties to “True”. Just by doing this, you get a VistaGlass (Aero) dialog!

ย 

To preview your achievement, click on the Test Dialog toolbar button (the one with the thunderbolt icon).

Next Steps

You might be wondering if it’s really that simple. Basically, yes! You now have full Vista Aero Glass effects on your dialog. Due to the beta nature of the component however, some controls render awkward. We can make it all look better with some tricks. Instead of glassing the entire dialog, lets focus on glassing a targeted region first. We need to change two properties for this one. The first is called “SheetOfGlass” – change it from “True” to “False”. The second is “GlassBottom”, which sets the pixels occupied by the glass effect, counting up from the bottom of the dialog. With the “Official Theme”, try setting“GlassBottom” to “301”. Now our UI looks much better!

Pro’s and Con’s

It’s obvious that by using VistaGlass on your setup UI, you’re giving your users a richer setup experience. They get the “wow” before even having used your product for the first time, giving you a clear advantage over your competition just by using the right setup tool. Also, don’t worry if your setup needs to run on versions of Windows earlier than Vista. The VistaGlass component auto-detects the end-user’s Windows version, and disables the glass effect on legacy operating systems automatically, without any error messages or other undesirable UI artifacts.

The only issue is that some controls don’t render correctly, but you can easily overcome those issues (even at this beta stage). InstallAware’s flexible MSICode lets you do anything you want. For example, I’ve manually calculated the TotalRequiredSpace value using MSICode, because the static label showing TotalRequiredSpace renders incorrectly on Glass, as a black rectangle.

ย 

I used the MSIcode functions “Get Component Space” to get the total bytes required, “Mathematics” to convert those bytes into KB or MB, and then “Set Variable” to concatenate the string “KB” or “MB” at the end of the value – finally displaying the result in a regular label, which does render correctly.

Conclusion

I’ve said this before but I’m going to say it again. By leveraging the Aero Experience on your setups, you impress your customers – on every single trial download! Give them the “wow” feeling right from the beginning…with your setup! You can also create your own themes by using the VistaGlass component and building on top of empty dialogs, or based off of an existing theme. You could even replicate, for example, the look and feel of Office 2007 installations using the tab component!

That’s all for today. Stay tuned people, more to come.

Panagiotis Kefalidis
InstallAware CCP — DataFire Software, Greece