
Wine powers Steam’s efforts to run Windows games on Linux (ex: Steam Deck).
Wine also powers Apple’s efforts to run Windows games on macOS (ex: Game Porting Toolkit).
Leverage the same technology with InstallAware 2026, effortlessly running your Windows software on Linux/macOS:
www.installaware.com/application-porting-toolkit.pdf
Wine is a binary application compatibility layer that works on both Linux and macOS, but it doesn’t handle installations very well.
Enter InstallAware 2026:
1. Install Wine like any other application runtime (ex: .NET) on Linux and macOS.
2. Install your own application (or any other third party application, for that matter), on Linux and macOS.
InstallAware 2026 converts any existing Windows Installer to a native-code, Linux and macOS installation.
You’re very welcome!
InstallAware 26H1 Shipping Friday This Week
o 10X Faster Pinning: Our efforts to extend application pinning support to Snapdragon pays dividends for Intel and AMD, too. Now Start Menu and Taskbar pins take milliseconds, instead of seconds or more.
o Payload Encrypting: An anti-virus will be quick to look at your self-extracting executable and take issue with your entirely legitimate program files. Now even non-password protected packages are secure.
o Windows 26H1: The Windows Features plug-in precision configures Windows operating systems you’re installing on, with a design time UI that exactly replicates the “Turn Windows features on or off” applet.
o InstallAware SPS: Ironically, getting paid in Solana is now even more viable for micropayments – entirely thanks to crashing crypto asset values! There’s no need to go through anybody’s app store anymore.
o InstallAware DiskZIP: Think ZIP, but for your entire disk – including the whole operating system, program files, everything. Now think booting Windows directly off that ZIP, without having to unzip anything!
o ARM64 Compression: Now that Snapdragon CPUs have also been split into performance and efficiency cores, ensure that your time-sensitive compression jobs are always scheduled on the actually fastest CPU cores.
o Seamless Upgrade: No matter which setup builder you’re coming from, there’s many ways to ingest your existing projects into InstallAware – from direct MSI database imports, to setup capture based system monitors.
New InstallAware 26H1 Cuts Down False Positives
The roaring 20s are full steam ahead at InstallAware. From porting “Delphi” to true ARM64 (without the “EC” bit) to leveraging that new compiler stack, arrives new InstallAware 26H1:
o Solana Payment System: Transaction costs are now less than half of what they were when we originally launched SPS; process micro transactions with ease while Crypto Winter is here.
o Windows 11 26H1: The OEM limited release powering exciting new Snapdragon Elite X2 devices is now fully supported together with Windows Feature definitions to configure Windows 11.
o ARM64 Updates: Pin your apps to the Taskbar and Start Menu on all ARM64 versions of Windows. Compression jobs land on Performance cores in ARM64 CPUs, instead of slow Efficiencies.
o ARM64 DiskZIP: Boot Windows compressed on all Snapdragon and upcoming Surface Laptop Ultra devices. New AI enhancements ensure even corrupt disks can’t interfere with OS integrity.
o No More False Positives: Packages you create with InstallAware are now encrypted by default, so no anti-virus can look inside and jump to wrong conclusions about your applications.
Plus, DiskZIP now runs on all Hyper-V and Apple Silicon Parallels/VMware machines too! Create tens to hundreds of extra gigabytes of disk space – without ever deleting a single file.
New AFDPPP Relaxes Apple App Store Policies
In a surprise development today, InstallAware Software was contacted by a Personal Assistant of Apple CEO Tim Cook, who announced InstallAware‘s selection as one of Apple’s new Free Distribution Partnership Program Pilot members.
The AFDPPP pivots away from Apple’s entrenched App Store policies, making use of Apple’s in-app purchase systems entirely voluntary. A vaguely related protracted legal battle had recently taken place between Apple and Epic Games, with escalation all the way to the Supreme Court at some point or the other of the proceedings.
Ms. April Furst, Personal Assistant to Mr. Cook, said “This Epic lawsuit was a wake up call for us at Apple. It may have reminded us our goal was to make the world a better place. It would seem we may or may not have lost sight of that original goal at some point or the other along the way. We asked our resident AI about this, and it suggested we drop our fear based programming. It highlighted the amount of cash we’ve piled in the bank might afford us the opportunity to let some developers self-publish/monetize here and there, and the AFDPPP was born.“
Unfortunately, InstallAware has yet to hear from the liaison assigned at Apple to coordinate this effort with InstallAware. Ms. Yavsak Gevrekkizi, Apple’s formally designated liaison, has thus far declined to initiate the onboarding process; instead emailing a brief note that read “I am neither the only person at Apple who is capable of undertaking this job…nor the most qualified person for this job. I am not sure I can run point for this task, given all this perceived pressure of other entities at Apple who may or may not be better poised to run point for said task.” InstallAware Software patiently awaits further guidance from Apple for details regarding the AFDPPP.
Edit: Sadly, the deal fell through. We understand InstallAware‘s insistence that Apple remove the artificial limit of two macOS virtual machines per device broke the talks.
A Case Study in Porting from Delphi to Lazarus ARM64: DiskZIP’s Shell Extensions
Having waited for almost ten years for Delphi’s ARM64 Windows compiler, we threw in the towel and sponsored Lazarus‘s ARM64 compiler:
www.installaware.com/lazarus-arm64.msi
For several years now, Free Pascal‘s ARM64 support had almost worked, with only a few outlier issues that resisted resolution. InstallAware kept prodding and prodding, and the community delivered! That’s the power of open source. You can read about my initial reactions here:
Lazarus for Windows on aarch64 (ARM64) – Native Compiler
TLDR; this post describes some of the problems we came across while porting our product from Delphi to Lazarus, specifically with a view towards how we resolved them. If you, like us, need true ARM64 support from Delphi and are tired of waiting – read on! This guide is intended for an audience that is totally new to Lazarus, and we hope to ease your pain with all we’ve learned.
ARM64 is NOT ARM64EC
Sadly, I must stress that ARM64EC is absolutely useless for anyone who actually needs a true ARM64 compiler. Even if ARM64EC code is comprised of “pure” ARM instructions, the binary format results in ARM EXEs that can load x64 DLLs, or ARM DLLs that can be loaded from x64 EXEs. Sure, the code that runs may be “pure” ARM, but it’s useless for all scenarios that actually require a true ARM64 compiler – of which we had one in our hands: Shell Extensions.
Shell Extensions are DLLs loaded by Windows File Explorer. Explorer is a true ARM64 process – it’s not an ARM64EC or x64 or x86 process. This means if you try to load an ARM64EC DLL into Explorer, that’s absolutely no different than trying to load an x64 DLL, or an x86 DLL into Explorer. It just won’t work. And you might think – like I did – that it defeats the purpose of having an ARM compiler at all!
Why We Needed True ARM64 for DiskZIP’s Shell Extensions
You’re already familiar with Shell Extensions, even if you don’t think you are.
Context Menus
You work with these, literally every day. Any time you right-click in Windows File Explorer, you’re basically working with Context Menu Extensions:
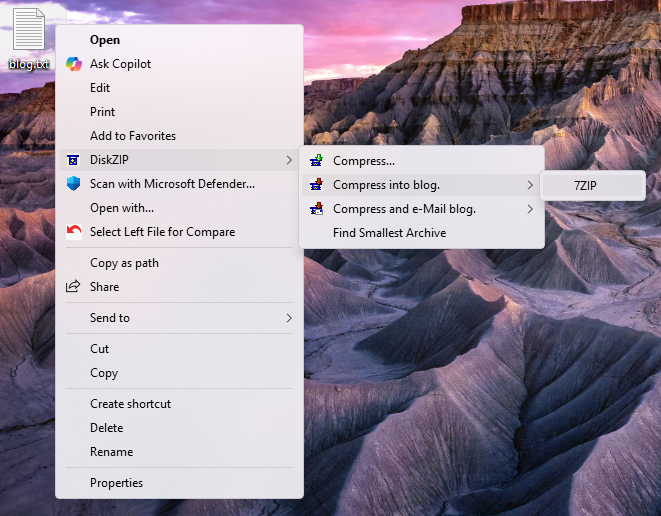
A real quick, brief sidebar here: While we certainly did port DiskZIP’s Context Menu‘s to ARM64, this was perhaps the most useless part of the exercise. Context Menu Extensions, as you already know, are so prevalent and ubiquitous! Windows actually supports loading x86 and x64 extensions inside the ARM64 version of File Explorer through various compatibility shims. This means the process isn’t perfect, but here is where a true ARM64 compiler does add the least value to the equation.
from InstallAware Context Menu Bridge – InstallAware
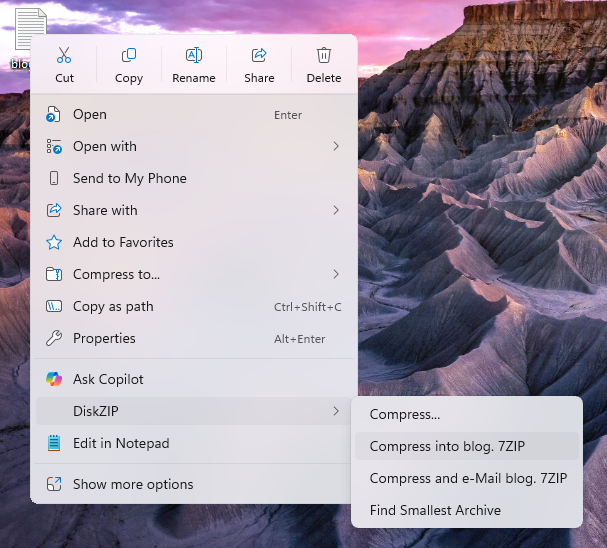
You might also be familiar with how most Context Menus are nowadays hidden inside Windows 11’s higher level menus:
We can’t take credit for this implementation, either. That was handled by the InstallAware team, and their truly magical Context Menu Bridge:
InstallAware Context Menu Bridge – InstallAware
To get your stuff showing inside this top-most level Windows 11-only menu, you actually have to do three things:
1) Write a different type of Shell Extension that’s NOT a Context Menu Extension
2) Build a Sparse MSIX package for it, and get it code signed (or Windows refuses to load it)
3) Automate the installation and removal of this Sparse MSIX package
Just to get on the new Windows 11-exclusive menu. Yes, it’s torture. That’s why InstallAware‘s Context Menu Bridge is a lifesaver, but that’s a topic for another post.
Copy Hooks
So you’re already familiar with right-clicking to create archives on Windows, who isn’t? But did you know that with DiskZIP, you can create new archives out of existing folders by just adding an archive extension to your desired folder?
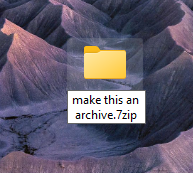
Isn’t that fun? The technical name for the type of shell extension that makes this possible is a Copy Hook Extension. It triggers when some file – or folder – is being copied, moved, or renamed – our extension fires on renames when it detects you’re using an archive file extension that is supported by one of its installed plug-ins: It blocks the rename, and compresses the chosen folder instead (leaving its original contents intact, of course).
And of course, all shell extensions we describe from here onwards, including the Copy Hook Extension, require true ARM64 compiler outputs. ARM64EC won’t work (so sadly, the upcoming Delphi won’t cut it). ARM64 Windows won’t emulate x86 or x64 shell extensions for Copy Hooks or anything else I’ve written about below.
Tool Tip Handlers
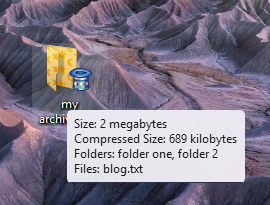
Here’s another fun one. Just hover your mouse over a file type, and get a customized textual preview of its contents – all dished up by the custom code running in your shell extension:
Property Sheet Handlers
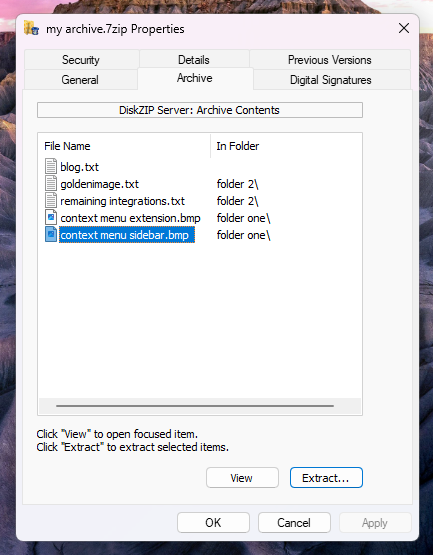
Did you know you can actually tap into the File Properties window shown by Windows File Explorer? Yup, that’s just another type of shell extension:
Drag and Drop Handlers
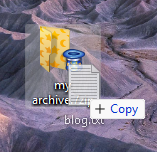
You know, like when you drag files on top of an existing archive – and it adds the files into the archive.
Shell Namespace Extensions
The name’s a mouthful for sure, but this is the best we saved for last:

You’re basically tapping into File Explorer’s tree, your code injecting virtual folders inside a given file type (such as an archive). You’re also injecting your own Lazarus (formerly Delphi) window directly inside File Explorer’s right pane, the contents of which you control exclusively. It’s a bit of rocket science to get it working right, honestly!
And yes, for all these things – you need true ARM64 – or File Explorer just won’t play ball, at all.
Porting Challenges
So Lazarus ARM64 definitely proves itself by being able to port a full-blown shell namespace extension from Delphi, and run it successfully under Windows File Explorer. But how did we get there, how hard was the journey?
It’s a lot easier than you think, actually. Here’s our findings, with shoutouts included for the best practices!
Start With Lazarus’s Own Import Process
You’re not the first one looking to bring over code and projects from Delphi, and it shows. Click Tools | Delphi Conversion on the main Lazarus menu. Choose Convert Delphi Project to Lazarus Project for the most comprehensive solution. Sometimes it helps to move over units (and forms) individually, for which you’d go with the Convert Delphi Unit to Lazarus Unit menu item.
Best practice: Always do the conversion on a copy of your projects folder, instead of the original project folder.
You can generally accept the defaults for the conversion. Lazarus‘s default conversion process takes care of most of the grunt work in getting started for you – such as adding in a vital Lazarus-only units that you may not already know about, which comes in especially handy when this is your first time using Lazarus.
Activate ARM64
Edit: The steps below are required only when you’re using the 32-bit Lazarus IDE.
After the original publishing of this article, the Lazarus team built a native ARM64 IDE, along with a native ARM64 debugger. This IDE cannot run on AMD/Intel platforms, so we updated our installer to seamlessly install the original 32-bit IDE on AMD/Intel, and to install the native ARM64 IDE on Snapdragon/nVIDIA AI PC/”Apple Silicon”.
This way, even if you don’t own an ARM64 device, you can still develop for ARM64 by doing what’s called cross-compilation. The steps below activate this convenient cross-compilation option, which was all we had when this article was first published:
Follow these steps to enable the ARM64 compiler sponsored by InstallAware:
- On the main Lazarus menu, click Project | Project Options. Then choose Compiler Options | Config and Target.
- In the Target platform box, inside the Target OS field, choose Win64.
- Inside the Target CPU family field, choose aarch64.
If your project is a DLL, Lazarus will now place it inside the lib\aarch64-win64 folder of your main project folder.
For executables, the outputs are found inside your main project folder.
Now the real fun begins 😀
When Projects Fail to Convert
It’s not a bad idea to create them from scratch. Simply start with an empty Lazarus project:
- On the main Lazarus menu, click File | New. Then choose Project | Application to start with a new GUI app.
- On the main Lazarus menu, click Project | Project Inspector. Right click “unit1.pas” and choose Remove.
- Manually convert all your units one by one using the Convert Delphi Unit to Lazarus Unit option.
- Add them in to your new Lazarus project using the Project Inspector.
- If you have any custom code in your DPR project file, paste it into its Lazarus equivalent in the LPR file.
- If you have any custom defines in your Delphi project settings, add them in to your Lazarus project:
a. On the main Lazarus menu, click Project | Project Options. Then choose Compiler Options | Custom Options.
b. In the Custom options box, type each define you have in your Delphi project using the form “-dDEFINE“, separating them with a space. - If your project references units in source paths, add them in with these steps:
a. On the main Lazarus menu, click Project | Project Options. Then choose Compiler Options | Paths.
b. Add each path to the Other unit files and Include files fields, separating paths using a semicolon “;“.
This approach works really well with projects that don’t convert over well for whatever reason.
When Forms Fail to Convert
In our real world experience, forms that had multiple nested controls didn’t port over too well. Also problematic was image data, which was sometimes encoded differently by Delphi. Re-creating complex form layouts can be a pain, so don’t despair and give these suggestions a try instead – pre-processing misbehaving forms using Delphi, before you feed things over to Lazarus.
Best practice: Delete all image data, saving all image content to temporary files first. You can always load them right back into your Lazarus form after the initial conversion.
Best practice: Delete all controls that you don’t already have installed on the Lazarus component palette. Alternately, you can take to AI (Claude seems to work well enough) to port over the components over to Lazarus first, which is also an effective strategy.
Best practice: Feed your forms directly to AI (again, Claude was what we used), asking it to convert from Delphi to Lazarus. Sometimes when there’s no obvious cause for failure, this gets you over the conversion hurdle.
Touching Up Converted Units
So you’ve got your project file (LPR) and your forms (LFM) converted over – congrats! Now it’s time to touch up the units themselves.
Best practice: Always add in Windows to your uses clause. Chances are it was already there, but removed by Lazarus during conversion.
Best practice: If you’re working with GUI projects, also add in the Interfaces unit to the first line of your project file (LPR)‘s uses clause, assuming it wasn’t there already.
Best practice: Again for GUI projects, be sure to add in the LCLIntf, LCLType, and LMessages units to the uses clauses of your form unit files (PAS) – chances are they’re there already, but we’ve seen them go missing every now and then.
Best practice: Add the define {$mode delphiunicode} immediately after your unit name declaration, especially if you’re wanting Unicode support in Lazarus. This define is the closest to what we get with Unicode Delphi.
Best practice: Manually replace all ANSI Windows API references with Unicode Windows API references. This is necessary because Lazarus defaults to ANSI versions of the Windows API. For example, replace CopyFile with CopyFileW, MoveFile with MoveFileW, etc. Most of the time, simply adding W to the end of the Windows API being rejected by the compiler because of string type mismatches works fine.
Best practice: The above applies to not just function names, but also to record names. For example, not only would you need to rename the ShellExecuteEx function to ShellExecuteExW, but also the record it uses from SHELLEXECUTEINFO to SHELLEXECUTEINFOW – the former just resolves to SHELLEXECUTEINFOA in Lazarus, which will get you stuck in ANSI-land.
Best practice: For undeclared APIs, structures, constants, etc. ask your favorite AI for Lazarus declarations designed to work with the {$mode delphiunicode}, or just copy them over from the Delphi “headers” for the Windows API:
- In your Delphi IDE, right-click the declaration and choose “Find Declaration” in the popup menu.
- Copy the constants/records right on over.
- Where record fields involve string types, make sure to explicitly convert them to Unicode strings for Lazarus. For example, a record field which reads LPCSTR would have to become LPCWSTR in Lazarus for proper Unicode support.
- Where declarations involve functions, you may need to also press Ctrl + Shift + Down Arrow to navigate to the portion of the unit which declares the external DLL it is imported from – you’ll want to copy over both the function prototype and its external DLL reference to your Lazarus unit.
- We worked a lot with COM interfaces, this being a Shell Extension undertaking; and found that interfaces were sometimes defined differently as compared to Delphi: Lazarus would complain that interfaces which we already implemented were somehow missing. In these cases, it was easiest to:
a. Right-click the interface, for example IContextMenu, and choose “Find Declaration of IContextMenu“. Note that you do this in the Lazarus IDE (and not in Delphi), seeing as you need to access how Lazarus defines the interface.
b. Copy over all the function prototypes into your own COM Object’s interface declaration, and of course also update the function signatures in your implementations of those functions to the Lazarus way of declaring things.
c. While you’re at it, make sure you’re using the right interface – adding a W where necessary to the interface name. - When parameter types change in function declarations, it is simply a matter of fixing code that calls those functions. For instance, where Lazarus expects the address of a variable, instead of the variable itself; just adding an “@” in front of the variable name pleases the compiler. The underlying APIs and function calls are all the same, it’s just about formatting the code to suit how it’s all ben declared, as it were.
- Last but not least, it is worth mentioning that some declarations may reside inside different units in Lazarus. You can always ask your favorite AI to see if it knows (if it’s hallucinating about the unit, chances are you’ll have to declare things yourself). I’ve also seen where ANSI functions/records are declared in Lazarus, but their Unicode counterparts are not – so it’s up to you again.
This is literally the entire gamut of the grunt work that Lazarus could not automate for us. We didn’t use AI for it, although you could certainly try and see how much you can get away with it?
Odds and Ends
So since we’re building shell extensions, our projects never had a predefined TApplication object. In Delphi, you can create a form without having an owner TApplication, but if you try this in Lazarus, it’ll crash everything swiftly. The cure is mind numbingly simple. Just make sure you use this code before creating any stand-alone forms you may have in your DLLs (admittedly, this may not apply to you):
MyApp := TApplication.Create(nil);
MyApp.Initialize;
Certain function names may also conflict between Lazarus class libraries and Windows – for us, TRTLCriticalSection and its associated function calls was one of these. Simply prefixing “Windows.” to all mismatched references (in both functions and data types) sorts this problem in no time at all, without having to rewrite your code to use Lazarus‘s library functions instead.
Touching Up Project Settings
So you’ve imported your project, forms, and units – and even gotten them to compile – great job!
One of the best surprises of Lazarus is after you manage to get things to compile, everything just works, exactly as it used to 🙂
After all, you’re literally porting to a dialect of the same language – and almost the same class library – we deserve this break, don’t we?
Debugging
Chances are by the time you’re reading this, Lazarus will already have a debugger for ARM64 – but as the earliest of the early adopters here, we weren’t as fortune.
Edit: Indeed, now we have an invaluable, native ARM64 debugger! The steps below would be required only if you’re running the 32-bit Lazarus IDE on an AMD or Intel device. Debugging automatically works on the ARM64 Lazarus IDE, even including support for attaching to external processes for DLL debugging (which comes in very handy when you’re debugging shell extensions, and need to attach to explorer.exe).
For those edge cases which must absolutely have troubleshooting help with a debugger, it helps to revert your project settings back to defaults, so you can step through your code line by line:
- On the main Lazarus menu, click Project | Project Options. Then choose Compiler Options | Config and Target.
- In the Target platform box, inside the Target OS field, choose (Default).
- Inside the Target CPU family field, choose (Default).
Now you can debug easily in the Lazarus IDE!
Of course, when you’re done testing, be sure to change your settings back to ARM64.
Also, keep in mind that some issues might only surface with an ARM64 target.
Don’t be shy to ask AI if you’re ever stuck and need further help!
Build and Enjoy
You’ve done it!
That wasn’t too bad, was it? We got everything done – for our extremely complicated shell namespace extension code – in just about a week’s time! I’m betting most of your projects would be done in an hour, or a day tops 🙂
You can take a look at our own work by installing DiskZIP from www.installaware.com/diskzip.exe – thanks to its intelligent InstallAware setup, it’ll seamlessly install the ARM64 components when you run it on an ARM64 device (such as native ARM Microsoft Surface hardware, or virtualized Windows 11 running on Parallels on your Apple Silicon device), while installing x86 or x64 components when you run it on other kinds of (virtualized) hardware – all from a single installation binary.
Now that your code is compiling under Lazarus, you’re basically one step away from compiling it natively for macOS and Linux, too! That’s exactly what we did some time ago, bringing InstallAware to Macintosh and GNU/Linux worldwide.
But that’s a topic for another blog post 😉
John Gaver
for InstallAware Skunkworks
InstallAware Solana Payment System Featured on CompanyGlance
CompanyGlance has a great writeup on our new Solana Payment System:
#blockchain
#cryptocurrency
#Developer
#digitalpayments
#InstallAware
#InstallAwareX18
#softwaresales
#Solana
InstallAware X18 Shipping Friday This Week
The time is now!
o Solana Payment System: Grow your topline. No red tape, no signup. Miniscule 1% transaction fee. Converts fiat currency. Unlimited reactivations with customizable leniency.
o Solana Project Wizard: Type in your product name, enter its cost, and provide your public key. Select an activation model, and you’re good to sell instantly!
o .NET 10.0.0, 9.0.11, 8.0.22, VC++ 2017-2026: All the latest runtimes for your setups. Thoroughly tested scripts on all platforms. Better integration reduces your customer support costs.
o SQL Server Express 2025: A single click to add SQL Server support to your setup. Check for (and install) your private named instance. Download it only if it doesn’t already exist.
o Visual Studio 2026 Add-In: One-click setup creation. Automatic detection of all project files and dependencies. As you edit your setup externally, it always syncs with the Visual Studio project.
o Windows 25H2 Feature Configuration: Prep your platforms with ease. Our configuration UI replicates Windows’s own interface, down to the minutest component dependencies.
o Users and Groups: Create Users and Groups for your services. Find all Users and Groups on a system. Add or remove principals to/from Groups. Convert between SIDs and principal names.
New InstallAware X18 with Solana Payment Service
What a busy year at InstallAware!
From open sourcing, to publishing our Application Porting Toolkit; and now, one-upping it all yet again, arrives InstallAware X18:
o Solana Payments: Freedom from any and all app stores! And payment processors. InstallAware takes a meager 1% cut. Virtually zero transaction fees. Suitable even for micro payments.
Free yourself from app store levies and tyrannical monopolies! Claim your financial independence with InstallAware X18:
– Your software installation unlocks only after your public key receives funds.
– Transaction takes 1 to 5 seconds tops, requiring only an Internet connection.
– Your customers don’t pay anything to reinstall – reactivations are unlimited.
– You pay InstallAware only 1% of what you make, there’s no signup fees at all.
– Solana has virtually zero transaction fees – move aside please, old Ethereum.
– Got you thinking about micro transactions? How about nano transactions maybe?
– Sell direct on your own terms reclaiming the Internet from horrible fiefdoms!
o Windows 11 25H2: Bullet proof deployments with peace of mind to the latest version of Microsoft’s flagship operating system – still an order of magnitude bigger than Linux and Mac.
o Visual Studio 2026: Single-click convenience, scanning your solutions and creating setups instantly without having to go under the hood (if you want to, you still can – of course).
o New Runtimes: Checking one box transparently adds .NET 10, .NET 9, .NET 8 – including their ASP.NET and Desktop flavors – and of course, Visual C++ 2017-2026 to your setup project.
o SIDs and User Groups: Create dedicated users and groups for your services, on local or remote devices. Easily enumerate all existing users and user groups, translate SIDs to names.
Get Out of Squircle Jail Free With InstallAware MP!
There’s a macOS Tahoe nuisance – icons being placed in squircle jail! Fortunately, there’s a smart company with a funny slogan to help with that, all programmatically (disclaimer – that’s us):
“Get Out of Squircle Jail Free With InstallAware MP”
https://www.installaware.com/iamp
Icons for macOS setups you build using this advanced installer, as well as apps you deploy with it, don’t have to worry about their icons being placed in squircle jail.
The tool takes care of it all using documented macOS APIs, and overrides the squircle jail defaults to display your original icons – exactly as they were designed to appear!
Star the source code repository at https://www.github.com/installaware/iamp – and build it from sources free.
If you want to see exactly how it’s done, here’s the relevant unit – https://github.com/installaware/IAMP/blob/main/utahoe.pas – hope that helps!
For more information, please read the awesome writeup at CompanyGlance:
https://companyglance.com/news/how-installaware-mp-fixes-annoying-macos-squircle-icons/
InstallAware APT Featured on CompanyGlance
Awesome new writeup about InstallAware’s new Application Porting Toolkit, and the Installation Virtualization technology making it possible:
https://companyglance.com/news/installaware-helps-port-windows-apps-to-linux-and-macos/
#linux #macos #3dmark