In my last post, we covered using InstallAware to install or un-install a third party MSI package. In this post we’ll cover a related task, running a third party EXE setup package, using the Run Program As command.
What does Run Program As do? As the name suggests, it runs a program (an EXE file) or pretty much any other kind of document/file that is recognized by the system and has a registered viewer/editor. The Run Program As command is very similar to the Run Program command – it has a few extra bells and whistles, so we’ll cover that one instead of the simpler Run Program command here. But remember that you are free to use either one that suits your needs…

As we did for the MSI setup, we’re going to place our Run Program As command just before the Apply Install command. Before moving further, also find out what command line parameters your EXE setup takes. Most EXE setups have fairly standard switches, such as “/s” or “/q” to indicate (without the quotes, of course) a silent installation. Other optional command line switches may also be available/necessary. Since this is different for each EXE setup, you’ll have to research this one on your own. Try running the setup file with a “/?” or a “/h” command line switch and see if it provides documentation on its proper usage. It’s also always a good idea to check the website of either the software vendor or the maker of the setup authoring toolkit, as one of the two is very likely to have their command line switches documented somewhere.
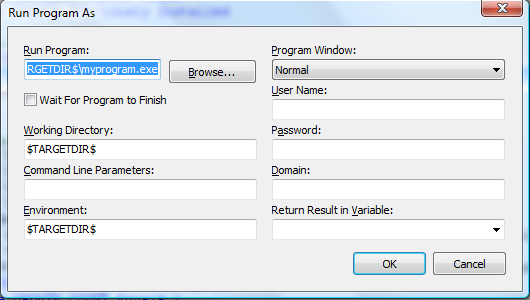
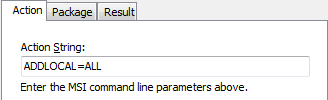
Let’s assume that the EXE setup we’re running today takes a parameter named “/install” to indicate an installation and uses “/uninstall” to indicate removal. So configure the Run Program As command window as in the screenshot below. If you want to run the EXE setup silently – probably a good idea – also add its silent installation parameter to the command line. I’ll also to catch the result of execution inside a variable called “RUN_ERROR“. If you haven’t defined this variable before, Run Program As will automatically define it for you. Of course, you’ll again need to check with your vendor documentation to find out what the return values for this EXE setup program are. Most EXE based setups return 0 to indicate success and 3010 to request a reboot (notably, Microsoft’s EXE setups). Your own experience may vary, based on the kinds of EXE files you’re trying this out with.
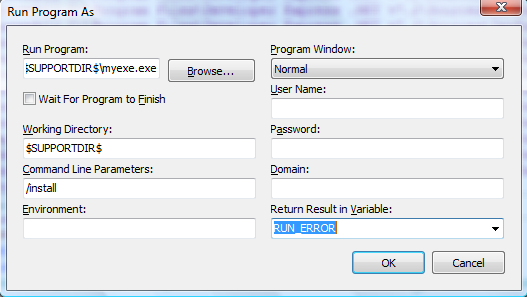
You probably want InstallAware to wait for your EXE setup to finish installing before moving on to the main installation. Running two setups on the target system simultaneously may not be that great of an idea after all 🙂 Check the “Wait for Program to Finish” check-box to enable this option. Also note that unless you wait, the RUN_ERROR variable will not hold the actual value returned by your EXE setup, and it will only be useful in determining if the EXE setup was actually successfully launched.
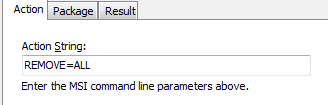
As for the uninstall, the process is very similar. We again call Run Program As, but this time with the “/uninstall” parameter. Place the command right before Apply Uninstall to make sure it’s being run at the right time in our MSIcode script, which in this case becomes right before the un-installation of our own product.
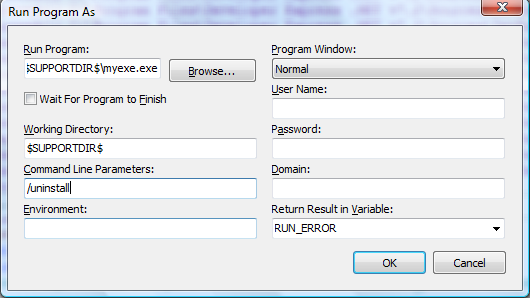
And yet again, I use the RUN_ERROR variable to catch any errors. A simple If command can later test the value of RUN_ERROR for me and determine if everything is kosher.
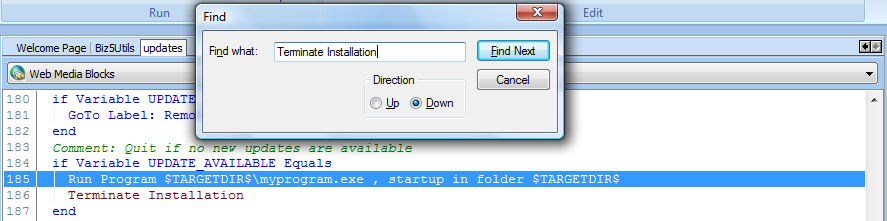
Well, that’s about it for running programs! While we’re at it though, another useful bit of information: You may also use Run Program As to execute your own main program file after your own setup finishes installing. By default, all InstallAware themes have a “Run Program Now” kind of checkbox in the setup finished wizard step, but even if your end-user checks it, that won’t do anything unless you let InstallAware know what to run here:

Replace the “Comment: TO-DO: Insert command that starts your application here” line with your own Run Program As command, specifying a target path like “$TARGETDIR$\yourexenamehere.exe“. Please note that most .NET applications today DO NEED their working directory field set to “$TARGETDIR$“, otherwise they will silently exit or raise strange startup errors. A well-authored application should never make assumptions about its startup folder, but some of us still do 😉
The Run Program command, by the way, automatically sets the startup folder to the same folder as the program being run – so no need to manually enter a directory in there, if you used that command instead.
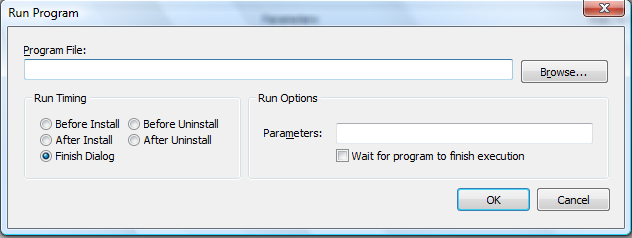
And for that matter, the Run Programs visual designer in the InstallAware IDE lets you do everything we did above graphically – even choosing the scheduling of the program being run:
a) Before Install
b) After Install
c) Before Uninstall
d) After Uninstall
e) Finish Dialog
Completely visually. But hey – it was fun to learn how to do it in script too, wasn’t it 😉 And if I had told you that at the beginning, you might not have read this far 😉 At least now you know what MSIcode script the Run Programs visual designer emits in the background for you 🙂
Well have a great month and talk to you soon!
Panagiotis Kefalidis
Software Design Team Lead
InstallAware Software Corporation


 and then