Extending MSI command line switches

Hi there! Today I’m going to show you how to extend your InstallAware setup packages to support custom command line switches. A frequent question we get is “why don’t standard MSI command line switches work?” The answer is really simple – InstallAware has its own bootstrapper and the command line parameters it accepts are well documented under the help topic “Setup Command Line Parameters“. In a nutshell, /s makes setup run silently, /l=<full path to log file> turns on logging, and you can pass variable values using the form “TARGETDIR=<path value>” (including the quotes, if you are specifying values with spaces in them).

Now that we’ve gotten the basics out of the way, let’s talk about how to extend this behavior. For instance, you  might have some real difficult customers who have this irrational insistence on sticking to standard MSI command line parameters. Or, more legitimately, you might be wanting to define your own custom command line parameters to do whatever you feel like doing with.

The $CMDLINE$ pre-defined script variable contains the exact command line passed to your installer. You can investigate what this variable contains using the If script command together with the Contains expression. This will make it very easy for you to test for the presence of custom command line switches. For instance, take a look at the following code snippet:

if Variable CMDLINE Contains /quiet
Set Variable SILENT to TRUE
end

This snippet uses the pre-defined script variable $SILENT$ to turn on silent installation mode when /quiet, a standard MSI command line parameter, has been passed to your installer. Easy enough!

For more complex evaluations, you can assign the $CMDLINE$ pre-defined script variable to a custom variable and then use the Parse String command to extract exactly whatever you need without destroying the contents of the original command line variable.

Talk to you soon!

Michael Nesmith
your friendly support engineer

Using compiler variables to customize setup at build time

Hello everyone, I hope you’ve all been well!

This post’s topic: How to customize your setup at build time. This could be used for different products, when only very few things change between them, and having a unique setup project for each one turns into a major copy and clone nightmare. It’s really a quite common scenario to have similar products using similar setup routines. At InstallAware, we actually ship a single installer that contains all four of our product editions – allowing users to choose at runtime which version they want to install. We might cover that in a later post; for now we’ll look at how to customize your installations at build time – emitting multiple “flavors” of a setup, if you will. This is where Compiler Variables come into play.

Compiler Variables are defined inside the Project Options window. To bring up this window, click the Project Settings button, found inside the Manage group of the Design tab.

Choose the Compiler Variables section and you’ll see three buttons, Add, Edit and Delete. This is where you define and set the initial values of your Compiler Variables. These variables are accessed using the #COMPILER_VARIABLE_NAME# format inside your MSIcode script. You may use these variables anywhere inside your script. Even MSIcode command fields which do not ordinarily accept variables will take compiler variables, since compiler variable values are “burnt-in” at build-time, and do not change at runtime.

In addition to replacing literals with values injected at build time, another use of compiler variables is to conditionally include/exclude parts of your MSIcode script. Use the Compiler Variable If, Compiler Variable Else and Compiler Variable End MSIcode commands to include/exclude parts of your setup project at build time. This adds a lot of flexibility to how you can build setups at runtime – you can take out whole blocks of MSIcode script, completely changing your setup logic and files – all at build time, and without needing to use complex automation.

Here’s a short list of what you can customize with compiler variables, among other things:

  1. Product name
  2. Product version
  3. Product code
  4. Files being installed
  5. Features being built

Take look at the code below to see what I mean:

As you can see, one of my compiler variables is “MYPRODUCT” and its defined/initialized on the Compiler Variables section of the Project Options window. The above code builds some files and features if the compiler variable “PRODVERSION” is equal to “Enterprise” but excludes one file if the compiler variable “SUBVERSION” is not equal to “Full”.

You might also want to take a look at the pre-defined compiler variables that already exist in InstallAware. There are two kinds of pre-defined variables – pre-defined compiler variables and pre-defined script/runtime variables – so don’t get confused between the two. Both of these pre-defined variable kinds come in real handy for lots of things, like figuring out the execution path of your setup. I’d definitely encourage you to take a look at them. Just search for pre-defined variables and pre-defined compiler variables in the help index.

My favorite compiler variables are the following:

  1. LOADOLDDATA: Instructs the setup engine to migrate feature selections from older versions.
  2. PROJDIR: Resolves to the project directory on your system.
  3. LOADOLDDATA: Instructs setup to change the way in which localizations are applied at runtime (see the help file for details).
  4. BUILDMODE: Resolves to CD, SFX, WEB, or PATCH based on your setup build mode.
  5. TITLE: Resolves to the name of the setup project.

Thank you,

Panagiotis Kefalidis
Software Design Team Lead
InstallAware Software Corporation

How to detect Windows Server 2008

Hi. Many of you have asked if InstallAware supports detecting the newly released Windows Server 2008. It’s very easy by using the code below:

Set Variable SERVER2008 to FALSE
Get System Setting Service Pack 1 into SP1
Get System Setting Windows Vista into VISTA
Get System Setting Windows with Server Features into SERVER
if Variable VISTA Equals TRUE
     if Variable SP1 Equals TRUE
            if Variable SERVER Equals TRUE
                  Set Variable SERVER2008 to TRUE
           end
    end
end

After this code runs, if the variable SERVER2008 is TRUE, then OS hosting your installer is Windows Server 2008. You can add this piece of code somewhere inside your main setup script, or inject it as a requirement inside the “Check Application Requirements” code folding region to prevent your installation from running at all if the target OS is not Windows Server 2008.

You can also check for Windows Vista with Service Pack 1 using the same script but by removing the “if Variable SERVER Equals TRUE” evaluation.

You can download the script from here.

Thank you,

Panagiotis Kefalidis
Software Design Team Lead
InstallAware Software Corporation

How to run a third party EXE using InstallAware

In my last post, we covered using InstallAware to install or un-install a third party MSI package. In this post we’ll cover a related task, running a third party EXE setup package, using the Run Program As command.

What does Run Program As do? As the name suggests, it runs a program (an EXE file) or pretty much any other kind of document/file that is recognized by the system and has a registered viewer/editor. The Run Program As command is very similar to the Run Program command – it has a few extra bells and whistles, so we’ll cover that one instead of the simpler Run Program command here. But remember that you are free to use either one that suits your needs…


As we did for the MSI setup, we’re going to place our Run Program As command just before the Apply Install command. Before moving further, also find out what command line parameters your EXE setup takes. Most EXE setups have fairly standard switches, such as “/s” or “/q” to indicate (without the quotes, of course) a silent installation. Other optional command line switches may also be available/necessary. Since this is different for each EXE setup, you’ll have to research this one on your own. Try running the setup file with a “/?” or a “/h” command line switch and see if it provides documentation on its proper usage. It’s also always a good idea to check the website of either the software vendor or the maker of the setup authoring toolkit, as one of the two is very likely to have their command line switches documented somewhere.

Let’s assume that the EXE setup we’re running today takes a parameter named “/install” to indicate an installation and uses “/uninstall” to indicate removal. So configure the Run Program As command window as in the screenshot below. If you want to run the EXE setup silently – probably a good idea – also add its silent installation parameter to the command line. I’ll also to catch the result of execution inside a variable called “RUN_ERROR“. If you haven’t defined this variable before, Run Program As will automatically define it for you. Of course, you’ll again need to check with your vendor documentation to find out what the return values for this EXE setup program are. Most EXE based setups return 0 to indicate success and 3010 to request a reboot (notably, Microsoft’s EXE setups). Your own experience may vary, based on the kinds of EXE files you’re trying this out with.

You probably want InstallAware to wait for your EXE setup to finish installing before moving on to the main installation. Running two setups on the target system simultaneously may not be that great of an idea after all 🙂 Check the “Wait for Program to Finish” check-box to enable this option. Also note that unless you wait, the RUN_ERROR variable will not hold the actual value returned by your EXE setup, and it will only be useful in determining if the EXE setup was actually successfully launched.

As for the uninstall, the process is very similar. We again call Run Program As, but this time with the “/uninstall” parameter. Place the command right before Apply Uninstall to make sure it’s being run at the right time in our MSIcode script, which in this case becomes right before the un-installation of our own product.

And yet again, I use the RUN_ERROR variable to catch any errors. A simple If command can later test the value of RUN_ERROR for me and determine if everything is kosher.

Well, that’s about it for running programs! While we’re at it though, another useful bit of information: You may also use Run Program As to execute your own main program file after your own setup finishes installing. By default, all InstallAware themes have a “Run Program Now” kind of checkbox in the setup finished wizard step, but even if your end-user checks it, that won’t do anything unless you let InstallAware know what to run here:

Replace the “Comment: TO-DO: Insert command that starts your application here” line with your own Run Program As command, specifying a target path like “$TARGETDIR$\yourexenamehere.exe“. Please note that most .NET applications today DO NEED their working directory field set to “$TARGETDIR$“, otherwise they will silently exit or raise strange startup errors. A well-authored application should never make assumptions about its startup folder, but some of us still do 😉

The Run Program command, by the way, automatically sets the startup folder to the same folder as the program being run – so no need to manually enter a directory in there, if you used that command instead.

And for that matter, the Run Programs visual designer in the InstallAware IDE lets you do everything we did above graphically – even choosing the scheduling of the program being run:
a) Before Install
b) After Install
c) Before Uninstall
d) After Uninstall
e) Finish Dialog

 
Completely visually. But hey – it was fun to learn how to do it in script too, wasn’t it 😉 And if I had told you that at the beginning, you might not have read this far 😉 At least now you know what MSIcode script the Run Programs visual designer emits in the background for you 🙂

Well have a great month and talk to you soon!

Panagiotis Kefalidis
Software Design Team Lead
InstallAware Software Corporation

How to install (or remove) a third party MSI using InstallAware

Hello everybody! In this post I’m going to show you how to install third party MSI files using InstallAware. We’ll achieve this functionality using the (Un)Install MSI Setup and File Bag MSIcode commands.

First, what does the File Bag command do? Think of it as an extended support files mechanism. While support files (also called Creatives in the InstallAware IDE’s visual designers) are a great way to add temporary files to your setup, they lack the ability to recurse into multiple folders. Support files also cannot be placed inside a web media block – they always go inside the main setup.exe file. So File Bag is essentially a fix for these two problems – this command lets you add temporary files to your setup which are only available while setup is running (and not permanently installed on the end-user system), is web media block friendly, and also supports recursion.

Next, what does (Un)Install MSI Setup do? As the name implies, it can install or uninstall an MSI based setup. The beauty of this command, as opposed to using another built-in command like Run Program to install third party MSI files, is that it captures native progress as well as the final error/success state of the installation, along with any textual error description text if applicable. This makes your setup look more professional: even the progress of external setups will be displayed in your own custom dialogs at install time, and you can provide very effective error handling and troubleshooting.

Now that we’ve gotten the preliminaries out of the way, lets get to work. A good example of to use the File Bag command is in our own pre-built setup script for the Microsoft .NET Framework 3.0. You can add this runtime to your setup and then switch to the MSIcode view to investigate how we’ve used the command.

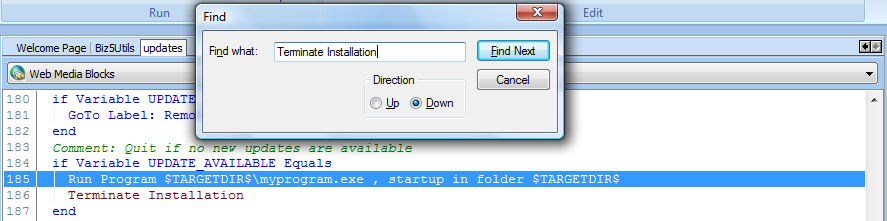
The File Bag MSIcode statement:

And the File Bag command window:

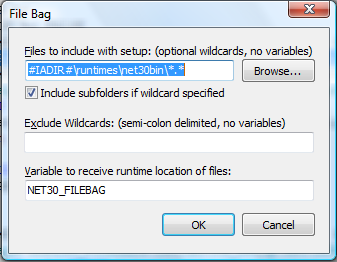
The pre-defined compiler variable #IADIR# simply returns InstallAware‘s main installation folder, which is the parent folder of the setup files for the .NET 3 Framework. In this field, you can enter any path you like, or just a single file name – as long as it points to the file(s) you want to add to your setup as a temporary resource.

The other interesting field in this command window is the NET30_FILEBAG variable. You may enter any custom variable in this field (as long as you pre-initialize it using the Set Variable command to an empty value). You should always provide a variable in this field, because the temporary location where File Bag makes your “bagged files” available at runtime will always change from machine to machine and setup to setup. So unless you provide a variable in this field, you won’t be able to access your bagged files at runtime, which beats the whole purpose of using File Bag in the first place!

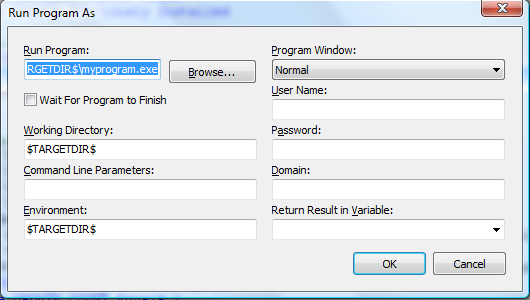
Next lets take a look at the command window for the (Un)Install MSI Setup plug-in.

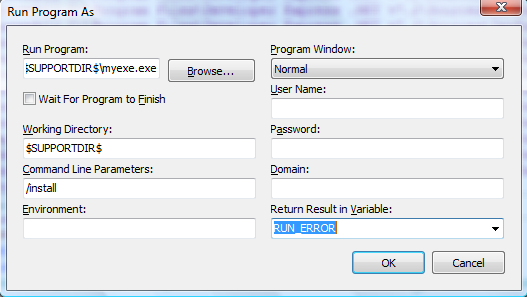
The Action tab indicates the installation/uninstallation mode and passes additional command line parameters to setup:

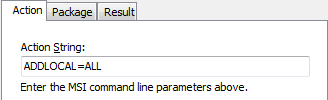
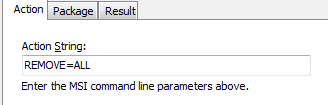
When installing an MSI file, you typically enter ADDLOCAL=ALL here, to install all of the features that are provided with the MSI. When uninstalling, you typically enter REMOVE=ALL. You are free to set any other MSI properties using this field, to install precisely those features that you require, or perform a customized MSI installation.

The Package tab specifies the MSI package to use, by filename (used when installing) or by package GUID (used when uninstalling):

When installing, you’ll want to specify the full path to the third party MSI file. The path will always be composed of the variable populated by File Bag, followed by the subfolder (if any) and the MSI file name. When uninstalling, you may again reference the MSI file by its full file path; alternately you may simply reference it by its unique package GUID (the GUID may be found by opening up your MSI package in Orca, navigating to the Property table, and copying the full value, including the squiggly parenthesis, corresponding to the ProductCode property). Using the GUID can be more advantageous when uninstalling, since you won’t need to provide access to the MSI file (often inconvenient to do at uninstall time – you hardly want to prompt your end-users for a setup CD when they’re just trying to remove your product).

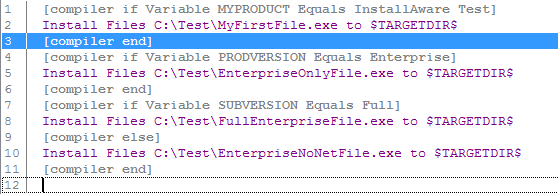
Here’s an MSIcode snippet that shows the proper placement of the (Un)Install MSI Setup command for use at uninstall time:

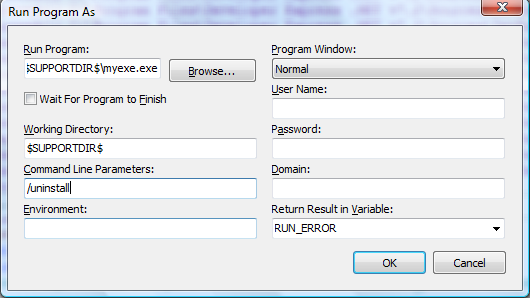
And this is how the Action tab would look for the command when uninstalling (again, feel free to add additional properties):

So now, you know all you need to add temporary files to your setup, and to run third party MSIs, even natively capturing their native setup progress, to install or remove them 🙂

One last thing worthy of mention is the Setup Decompressor. This is a very handy tool that InstallAware originally built for Microsoft in 2005, to optimize the compressibility of their then-current .NET 1.1 Framework. This tool works with MSI (and a few other file types) and decompresses their data. However, it doesn’t just “extract” data like unzipping a ZIP file. What it does is, it first extracts the data, then re-inserts it back into the original file, in unmodified form – only uncompressed this time (think of it like re-creating a ZIP file with “stored” compression, so the files inside the ZIP archive are not compressed but just stored as-is).

Why would anybody want to do this? Data Compression 101: No matter how good a compression algorithm is, it cannot recompress data that has been compressed before. So for example, lets say you have a 10 MB file, and when you ZIP it, it goes down to 5 MB, and when you CAB it, it goes down to 3 MB…you might think that when you CAB the 5 MB ZIP, it would again come down to 3 MB…but that’s not the case. You still get a 5 MB CAB – because the 5 MB ZIP has already eliminated redundancies in the original uncompressed data stream (even though it did a worse job at it than the CAB).

InstallAware‘s compression algorithm is far better than the compression used in MSI files, but if you feed it pre-compressed data (such as “off-the-shelf” MSI files, which are always compressed using CAB), it won’t be able to reduce file sizes any further. For this reason, you want to run the Setup Decompressor on your MSI files before packaging your setup with InstallAware. Since Setup Decompressor is non-destructive, it will never harm your MSI files or change the files they contain in any way – other than reversing their compression. And this way, InstallAware is free to work miracles in compressing your MSI files!

Just take a look at .NET Framework sizes, when packaged natively (as by Microsoft) and with InstallAware (after pre-processing by the Setup Decompressor). Typical size savings are 40% over the already compressed size of the native Microsoft files, and sometimes as high as 67% (as in the case of the .NET Framework 1.1 with SP1 inlined). You’ll be pleased to know that the Setup Decompressor also works with other file types – such as CAB, MSM, MSP, and even some kinds of EXE files. Just try it out!

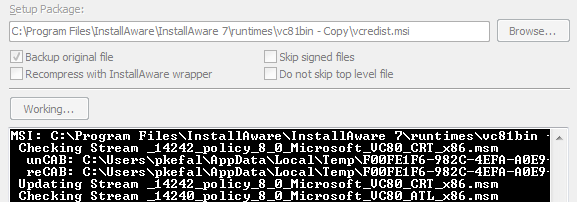
To open the Setup Decompressor tool, click the Decompress button in the Tools group on the Design tab of the InstallAware IDE:

All you have to after this is click the Browse button and select the MSI file you want to decompress. Click Decompress and the fully automated Setup Decompressor gets to work for you – and provides live status update as it investigates the various archives and streams inside your MSI file. I also recommend checking the Backup original file option – just in case you run into a bug that we haven’t encountered yet 😉

So, that’s it for now. In my next post, we’ll cover a related topic, “How to run a third party EXE using InstallAware“. Until then!

Thank you,

Panagiotis Kefalidis
Software Design Team Lead
InstallAware Software Corporation

Online Serial Key Validation with InstallAware, the Code Part

Hi all! It’s been a few days since my last post about wrapping our update mechanism around your application and it’s time for some web server code samples; but first, I wanted to make an enhancement to the update script.

If we want to change our “Run Program As” commands, we’ll have to edit multiple parts of the update script. At best, this is tedious; typically it will introduce errors with forgotten or misplaced commands. The solution is simple: we’ll use the Label and GoTo Label MSIcode commands to create a re-usable region of code. This way, we’ll remove all pairs of existing “Run Program As” and “Terminate Installation” commands, replacing them with a GoTo Label command that points to a new “Label” called “RunProgramSection“, with the “Run Program As” and “Terminate Installation” commands underneath.

becomes:

So now, instead of making changes all over the place in the MSIcode script, I only have to make one change under the Label command. That way, I can re-use this code block in other projects:

I can also build in more sophisticated behavior, adding more MSIcode commands. Lets say you want to run two programs – one might be a tray application and the other one the “real” application.

Quite easily done. Extensibility and scalability are everything these days!

And now for some server side code. First, please make sure you’re familiar with a server side scripting language like PHP or ASPX. Please visit www.asp.net and www.php.net if you need a jumpstart. I’ll assume that you’ve done your homework and that you can follow the simple scripts provided below.

First some PHP. If you remember, I pass some parameters from my MSIcode InstallAware setup/client script to the web/server script as URL parameters. In PHP, URL parameters are stored inside a predefined variable called $_GET, which is a global array. If you want to read a user’s serial number and your parameter is called serial, you can try the following:

$serial = strip_tags($_GET[‘serial’]);

Now, the PHP script variable $serial has our parameter’s value. Let’s see if the serial number provided is actually valid:

if ( CheckIfLegimitate($serial) )
return “1,”.srand(time());
else
return “0,”.srand(time());

If the serial is valid, the PHP script above returns “1”, or “0” otherwise. Either way, the return value is appended with a comma delimited random number. Back on the InstallAware setup/client side, I read this value using the “Download File” MSIcode command, and I then parse it using Parse String; which lets me obtain both the status code (“1” or “0”), and of course the random number.

Next post: Database schema scripts and more code. It’s going to be the last post from these series so, stay tunned!

Panagiotis Kefalidis
Software Design Team Lead
InstallAware Software Corporation

Online Serial Key Validation with InstallAware, the Updates Part

A question we get a lot here is how exactly our update mechanism works. It’s actually very straightforward. You define your existing software update packages inside our IDE, which saves that information inside an updates.ini file. You then upload both the update installers (patches, single exe’s, whatever you like) and the updates.ini file, overwriting the old INI if any, and you are good to go! The next time a scheduled update check runs, your users will be automatically notified by the InstallAware Web Update Client that new updates are available for download. But what if you want to check for updates each time that your application is launched, and automatically install them if any are available?

As I am fond of saying, InstallAware is extremely flexible. There’s a very simple way to do this. To get started, open the updates script at the MSIcode tab – this is found under the “Include Scripts” heading of the Project Manager which is normally docked to the left of the IDE in the MSIcode tab.

and then

The updates script creates shortcuts for the InstallAware Web Update Client wrapper. If you look at lines 24 and 26 of the standard update script, you’ll see that these shortcuts point to the $UNINSTALLLINK$ pre-defined MSIcode variable. This pre-defined variable points to your setup.exe file as cached on the target system, which acts both as your setup driver, and also the web update client.

Now, in your main setup, instead of creating a shortcut for your application’s EXE file (ex: C:\Program Files\My Software\My Application.exe), create a shortcut for $UNINSTALLLINK$ instead (type this inside the Shortcut to File field), and specify the “/update” command line parameter for the shortcut, which will start setup.exe in web update client mode (instead of the regular maintenance/uninstallation mode).

Also, remember to change the shortcut icon to your application’s icon, so your users won’t be confused with a setup icon in their Start Menu.

Now, every time a user clicks your application’s shortcut in the Start Menu, the web update client will launch, and check for updates! But of course, we still need to fix the web update client so it’ll know to launch the main application after checking for updates. Otherwise, users have no way of running the application, since the Start Menu shortcut doesn’t even point to your application anymore.

This is easy too. Again, on the MSIcode tab, navigate to the updates script.

Search for the “Terminate Installation” command throughout the updates script. I recommend typing Ctrl+F and searching for “Terminate“, and then repeating the search by typing F3. That way you won’t miss anything.

Before each “Terminate Installation” command, insert a “Run Program As” command with the target being your main application file (such as “$TARGETDIR$\my application.exe”), and also setting the working directory to “$TARGETDIR$“.

Copy-paste this command before each “Terminate Installation” command inside the updates script. With this simple trick, your application will launch any time the web update client exits – be it upon user abort, failure, or successful update installation. You’re fully covered since you addressed each script termination point.

What if you want to check if this end-user has not paid her subscription fees and thus updates are not to be made available for her? It’s easy. Set up a web page and call it like I described on my previous post using Download File and Parse String – to find out if your user is eligible for updates. I do this by passing her serial number as a parameter to my custom check_updates.aspx page on the server, and then I read back the response. If the response is “1” the end-user can update but if the response is “0“, the end-user is denied access to the update. When the response is “0” you can place another “Run Program As” and “Terminate Install” command pair, in order to make your program run directly without checking for updates. You should place all of these MSIcode commands at the very top of the updates script, before any actual web update client code runs.

Coming up next: It’s about time to look at some .php and .aspx code, and also MySQL and MS SQL database scripts, for the server back end! Don’t miss it! 🙂

Panagiotis Kefalidis
Software Design Team Lead
InstallAware Software Corporation

Online Serial Key Validation with InstallAware

I’ve spent a lot of time thinking about my next blog post. I’ve had some really crazy ideas like creating a plug-in to run my own scripting language on top of InstallAware’s MSIcode. Yeah, I know it sounds crazy but it’s doable. InstallAware sets no limits on your imagination. After getting down to earth, I combed our community forums for ideas and voila! This one gets a lot of requests so I’m going to show you how to create your own online serial key validator dialog/script with InstallAware. This post will be the first in a series in which we’ll make an online serial validation mini-suite for your applications. At the end of the series, we’ll have complete MSIcode, ASPX and PHP scripts and a sample project with dialogs. My examples will be simple but once you get the idea, you’ll be able to modify my scripts or create your own from scratch easily.

My basic approach is as follows: In the setup wizard, I prompt the end-user to key in their serial number. After the serial has been entered, I connect to my web server using the Download File MSIcode command, and I ask my script (residing on the web server) to validate the serial number live. If the serial is valid, the web script returns “1” along with a random number, if it’s not, it returns “0”. Note that there are lots of different approaches you can take when validating the serial number. You may, for example, first check if the serial number exists in your database. If it doesn’t, you can run your serial number algorithm to determine if it’s legitimate and then add it to your database, along with some other registration data, like user name, email address, company name, and so on. Alternately, even if the serial number already exists in your database, you can run additional checks to make sure its not a pirated key that has been going around for some time. You could for instance bind each serial to a unique installation ID, or what have you.

Getting back to my particular scenario: When my web server script returns a “1” followed by a comma delimited random number, I parse that string in InstallAware’s MSIcode to get the random number part (I use the Read from Text File and Parse String MSIcode commands). I then query the web server again with that value to dynamically determine what product version the end-user is licensed for, and which setup features should be enabled/visible on his/her “Components Tree” dialog. So again using Download File, I pass two parameters to my web script. The first is called ticket and is the random number that is valid for this session only. The second parameter is called component and is the name of the setup feature that I am validating for this particular end-user. On the server side, the script runs its validation against the database and returns a 0, 1, or -1 as a result. -1 means that this feature is disabled and invisible, so the end-user doesn’t even know it exists (this can be useful for trial version installations), 0 means that the feature is disabled but visible, so the user knows it exists but cannot select it (useful for licensed products on the lower-end of your product edition spectrum), and 1 means that the feature is enabled and visible, so the user is fully licensed for that feature. As I evaluate the results using If commands in MSICode, I dynamically enable or disable the relevant setup features using the Set Component Choice and Set Component Visibility MSIcode commands. In case you’re wondering why I use a random number ticket, I use it as a unique temporary key, to query my web server/database and find out which setup features should be enabled. A “security” pre-caution if you like.

In my next post, you’ll see how to wrap InstallAware’s update mechanism around your application. I’ll extend the built-in update functionality to use my online serial key validation mini-suite and check if the end-user actually has the rights to make updates – and allowing them only if (s)he bought a software subscription plan. Stay tuned!

Panagiotis Kefalidis
Software Design Team Lead
InstallAware Software Corporation